SCCM by Davis: “Bechir Gharbi wrote a new post, System Center 2012 service pack 1 is RTMMMMMMMM !!!!!” plus 19 more |  |
- Bechir Gharbi wrote a new post, System Center 2012 service pack 1 is RTMMMMMMMM !!!!!
- SCCM 2007: Support for Windows 8 and Server 2012
- Microsoft releases update to support Windows 8 and Server 2012 in ConfigMgr 2007
- SCCM 2012: Why Microsoft does not call SCCM SCCM?
- Availability Management: How to monitor Web Applications with Microsoft System Center Operations Manager 2007
- SCCM 2012 Reporting for dummies: Creating your own SSRS reports
- ConfigMgr (SCCM) 2012 wont open console–cannot connect to the site
- SCCM: How to deploy a shortcut
- Distribution Point no Windows 7– SCCM 2012.
- SCCM - extracting the number of SEP definitions stored on the server
- PowerShell ver. SCCM 2007
- SCCM 2012 Reporting for dummies: Viewing Console and Web Reports
- RE : Software Assurance Pays Off Remote Connection to WinPE during MDT SCCM deployments
- SCCM How to deploy a client
- SCCM 2012: Azure-based cloud Distribution Point
- SCCM 2012: OSD–Should Office (or any other App) be a part of base image?
- Rod Trent posted an update in the group System Center Suite 2012: All the bennies: Microsoft updates the “What’s New” page for […]
- Rod Trent wrote a new post, All the bennies: Microsoft updates the “What’s New” page for System Center 2012 SP1
- Rod Trent wrote a new post, myITforum coming to the System Center Universe
- You Are Invited to Join Us at System Center Universe 2013
| Bechir Gharbi wrote a new post, System Center 2012 service pack 1 is RTMMMMMMMM !!!!! Posted: 21 Dec 2012 12:21 AM PST |
| SCCM 2007: Support for Windows 8 and Server 2012 Posted: 01 Nov 2012 10:49 AM PDT Microsoft published an update for SCCM 2007 SP2 AC to support the new OSes: http://support.microsoft.com/kb/2750782 or http://blogs.technet.com/b/configurationmgr/archive/2012/11/06/hotfix-update-adds-support-for-windows-8-based-client-computers-in-system-center-configuration-manager-2007-sp2.aspx There is no plan to support OSD though! You have to use MDT 2012 or SCCM 2012 (aka CM12). More details here: http://blogs.technet.com/b/configmgrteam/archive/2012/10/31/update-on-windows-8-and-windows-server-2012-support-in-cm-and-ep.aspx |
| Microsoft releases update to support Windows 8 and Server 2012 in ConfigMgr 2007 Posted: 31 Oct 2012 11:23 AM PDT Microsoft has added support for Windows 8 and Server 2012 in Configuration Manager 2007 and Endpoint Protection. This will provide support for the mentioned operating systems, but as previously mentioned, there is no support for OSD. Read the official blog post of the Microsoft System Center Configuration Manager Product Group. The download is available in the blog post above. |
| SCCM 2012: Why Microsoft does not call SCCM SCCM? Posted: 30 Oct 2012 01:45 PM PDT Several years (I believe with start of SCCM 2007) Microsoft corrected me with the acronym: "Do not call it SCCM – it should be ConfigMgr". At that point of time they explained it this way: "SCOM does not sound good, so it will be OpsMgr, then SCCM will be ConfigMgr". Hmm… I recently bumped into an article explaining it a bit differently, with more sense: http://support.enhansoft.com/Blogs/post/What-is-the-Official-Acronym-of-System-Center-2012-Configuration-Manager.aspx
According the article we had (officially) ConfigMgr for 2007 and nothing is blessed for SC Configuration Manager 2012. One of variants – CM12. I am voting for it, but still think most of my Clients will call it SCCM and may be confused with another acronym |
| Posted: 30 Oct 2012 01:30 PM PDT Microsoft System Center 2007 can emulate end user experience by monitoring a Web Application. Here's how to monitor a Web Application, even if it is require credentials, and how to record a browser session
How to Create a Web Application Monitor
How to add authentication credentials to your Web Application Monitor
The Web Application Properties are also useful for defining other parameters, such as:
How to record a browser session
How to generate an alert from a Web Application Monitor 1. In the Operations Console, click the Authoring button 2. Expand Management Pack Templates and click Web Application, select the created web application monitor and choose Edit web application settings 3. Set the proper criteria that will generate an error health state, and select the option "Generate an alert if any error criteria is met". How to Create a Monitoring Alert 1. In the Operations Console, click the Monitoring button and select the monitoring button 2. Create a new Alert View, give it a name such as URL Alert 3. Under Criteria ? Show data related to, look for target of the web application monitor you created and click OK. 4. It will show all alert related to the monitor. 5. Then try to stop the monitored web site for testing. Suppose an alert will be generated under the newly created alert view. 6. You can create a new email subscription to the generated alert. To do so, click the generated alert and then click Create under Subscription in the Actions pane. |
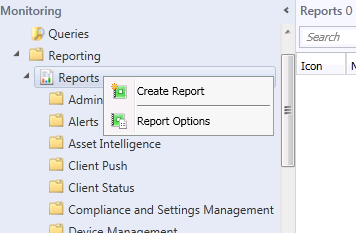
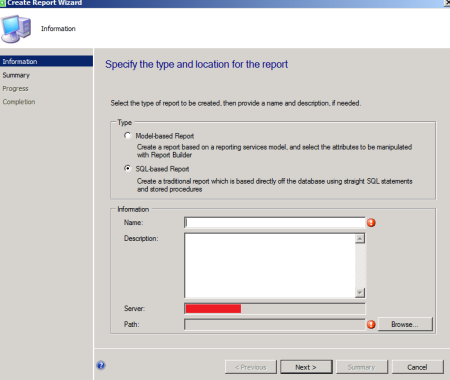
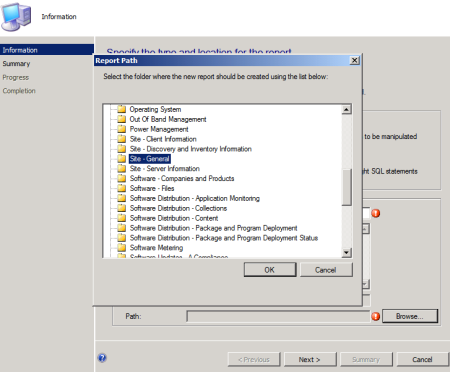
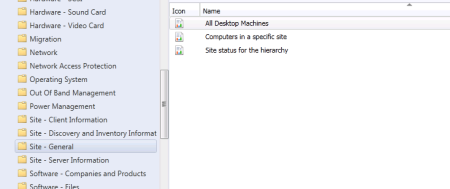
| SCCM 2012 Reporting for dummies: Creating your own SSRS reports Posted: 29 Oct 2012 09:27 AM PDT So we've talked about reviewing reports out of the box using the SCCM console as well as using the web browser. We'll now get to the nitty gritty and create our own reports using SSRS. I'm sure you're all eager to learn as you've come this far in my "Reporting for Dummies" series. We'll first need to go into the console and open up the "Reporting" node under the "Monitoring" tab. Right click the "Reports" node and click on "Create Report". Remember, if you are getting the error (Report Builder 2.0 is not installed…) then you will need to edit the registry or close the console and attempt to reopen as administrator as I've advised in my previous blog post: You should now get a "Create Report Wizard" which will lead you through the steps required to create your own custom report. So we're going to create a SQL-based Report and we'll need to fill out the fields. We're going to name this report "All Desktops Machines" so type that into the "Name" field. We're also going to need to store the report somewhere so for the Path field, click "Browse". You can choose the most relevant category you feel the report should go under. For now, we're going to put this under "Site – General". Click OK and then click Next. You'll be on the summary page. Click Next and then close after the report is created. When you finish the report and click close, you should notice that SQL Server Report Builder should now open.
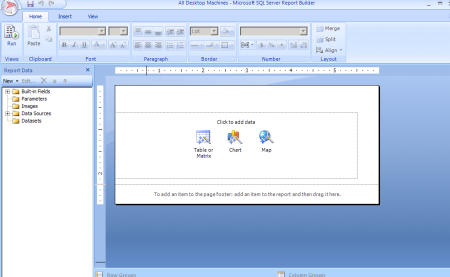
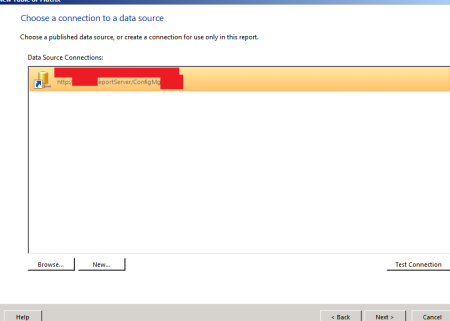
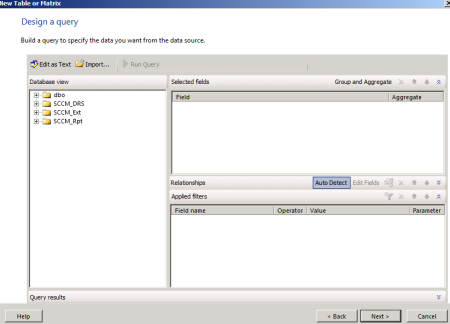
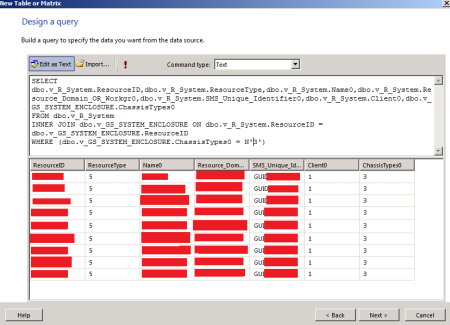
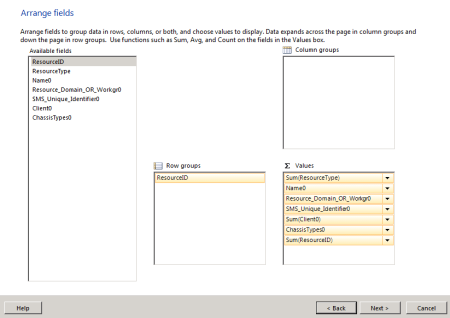
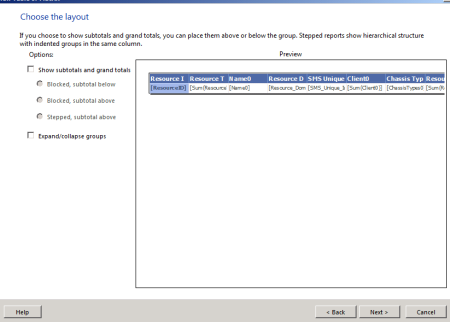
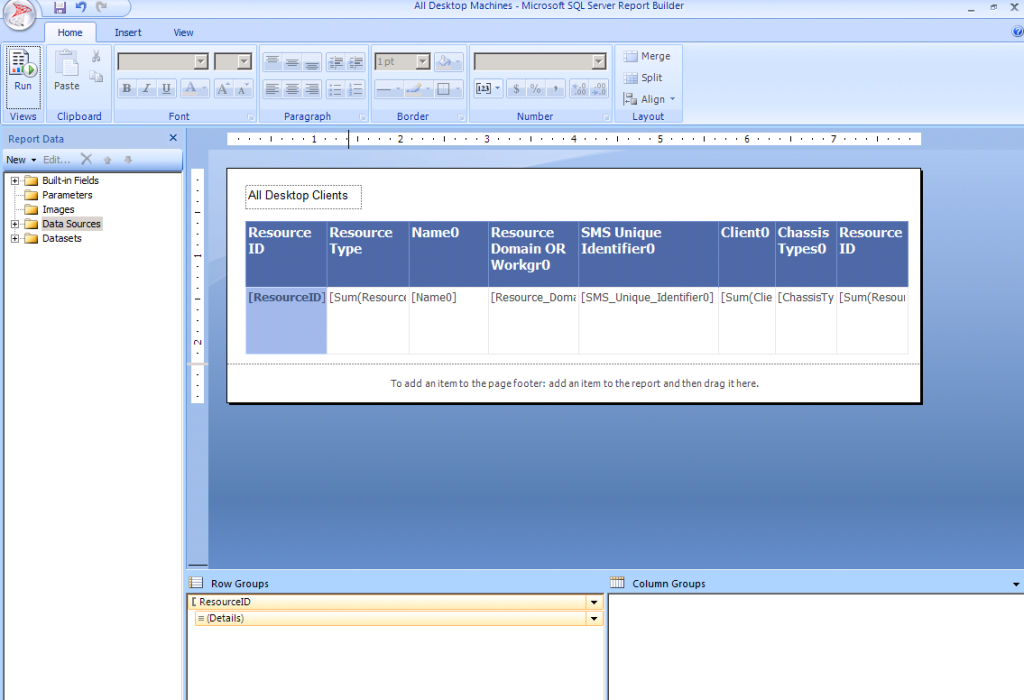
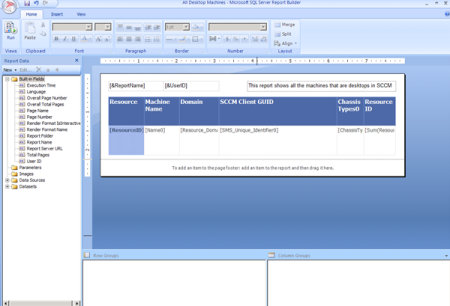
It should prompt you to enter the credentials that will be used to access the dataset. Enter in the relevant credentials that have access to the SCCM database and click Next. You'll now hit the "Design a query" page. This is practically the same as the query builder we saw when we were dealing with Queries! Click on "Edit as Text" in the top left corner. Now you are in the text editor mode, you can write your SQL query here. Remember SQL queries we did in an earlier tutorial? Well this is where it comes in handy! We'll be using the same SQL query as we did in that tutorial as we're creating a report to bring up all the desktop clients! Bet you didn't see that one coming did you! The query is this: SELECT dbo.v_R_System.ResourceID,dbo.v_R_System.ResourceType,dbo.v_R_System.Name0,dbo.v_R_System.Resource_Domain_OR_Workgr0,dbo.v_R_System.SMS_Unique_Identifier0,dbo.v_R_System.Client0,dbo.v_GS_SYSTEM_ENCLOSURE.ChassisTypes0 Copy this query and paste it into the query field. Now that you've pasted this in, click on the exclaimation mark (!) to run the query to see if it is correct. On the next screen, you'll get the ability to lay out how you want your report to look. I've selected all the resourceID field to be my row field so all the data will be stacked against this key field. I've placed all the other fields in the values field so they'll populate with values in the report. You can be selective here if you wish but I will be modifying the report in a moment so it doesn't matter if you leave them out now or delete them after the fact. Since this is a simple report that doesn't have aggregated values, we can uncheck the two boxes to create a simple report. Click Next and then Finish. You should be back at the report builder screen. You can start modifying the report to look exactly how you'd like as well as add new dynamic fields or text as you wish. Go crazy with it as you learn more by playing with the reports. For now, we'll just add in some simple text for a description and two dynamic fields from the "Built-in Fields" node.
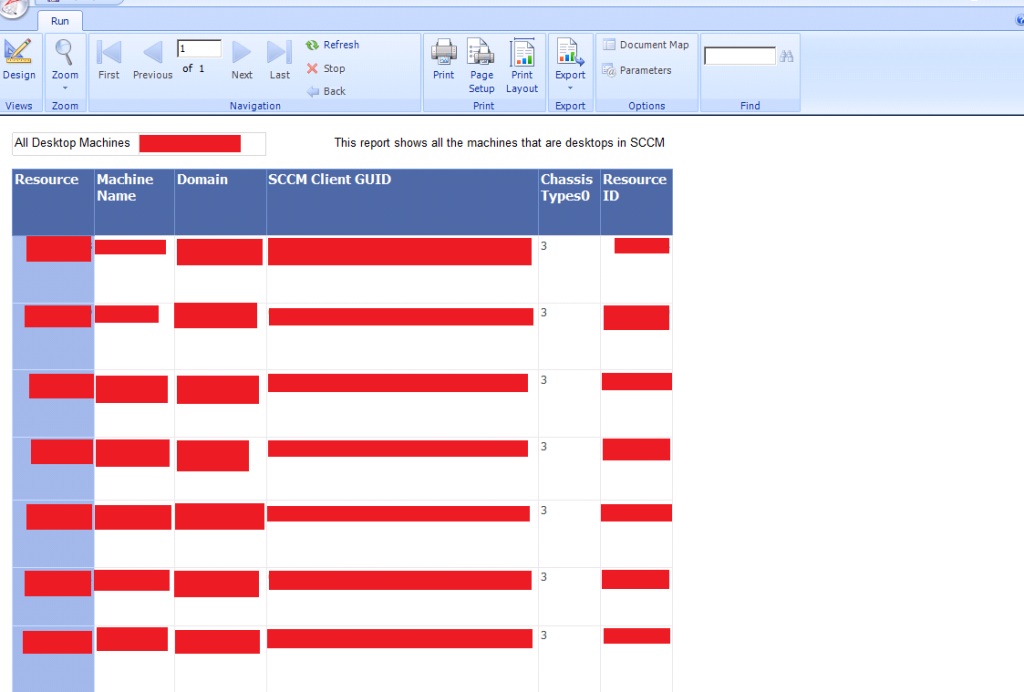
You can always go back to the design by clicking "Design" if you need to make modifications or tweaks to your custom report.
If we look in the reports under "Site – General" you should now see your new report. This will appear now in the console as well as the web reports. ~P~ |
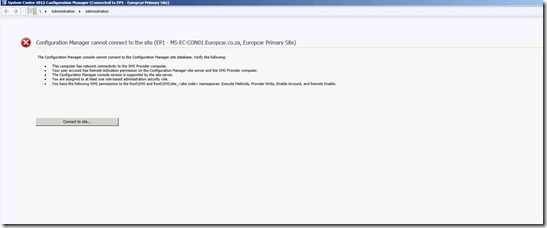
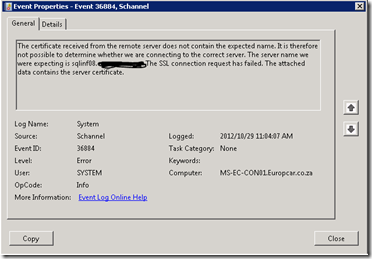
| ConfigMgr (SCCM) 2012 wont open console–cannot connect to the site Posted: 29 Oct 2012 02:37 AM PDT So, we have started our migration from ConfigMgr 2007 R2 to SCCM 2012. We have installed the new site and now we have started building the required collections as we are using a mix of old collections from ConfigMgr 2007 ( a lot of the built-in collections that are present in ConfigMgr 2007 are NOT present in SCCM 2012. So of course, copy and paste of the Query language is quite useful and this is one of the first things I would do when you are in the process of a SCCM Migration. Next up boundaries, at least the new version reads Active Directory and then creates the boundaries for you. We are creating custom Boundary groups so suit our needs as we have quite a mix of "FAST" and "SLOW" WAN links. So far so good, starting to push out clients and get them reporting to the new site. This is going well and can be time-consuming. So, we decided to install the Reporting Point so we can get some decent reports from the system. By now, it is late on Friday and I decide to push out the installation to a whole collection I have created and allow time over the weekend for the clients to install and report nicely back to SCCM. So, naturally on Monday morning I want to open the console and see how my "Client Push" went and I was greeted with the following. Not exactly want you want to see. So after some more digging around I found this in the event log. And what is really strange is that nothing had changed over the weekend and this is a brand new install and I was able to open the console on Friday afternoon to push out the clients. So, now for some troubleshooting, checked SPN's with this article, Check!!! no changes and still I cannot connect to the main site. So now time for some more digging. I now decided it was time to look at this from an SCCM Log point of view. For this, I opened SMSProv.log from the machine I was trying to connect to the console. More proof that something was wrong. So, now I decided to employ a good friend called Uncle Google. I was able to find a fix here. It turns out to be an issue with the SQL 2008 R2 Native Client, after removing the SQL 2008 R2 Client and installing the SQL 2008 Client, no more problems. I think the delay with mine, it that the SQL instance only failed to the second node in our cluster over the weekend. So, when trying to create a new connection to the new node, the native client for SQL 2008 R2 started its havoc. And it worked like a charm. Hope this helps, Follow me. |
| SCCM: How to deploy a shortcut Posted: 26 Oct 2012 07:42 AM PDT 1. Create a shortcut 2. copy the shortcut to a file share where you keep your package source files 3. Create a package containing the shortcut 4. Create a program to copy the shortcut to a location you need. Do not forget to put "cmd /c" if you use "copy" command. So it will look like: cmd /c copy yourlink.lnk <destination folder>\*.* Where to copy? First of keep in mind SCCM Client works under SYSTEM account and will not put the shortcut to a specific user desktop – for that better use GPOs. What you can do is to put the shortcut for All Users. In Windows 7 All Users Desktop is located %ProgramData%\Desktop you will not have access to this folder probably, but SCCM Client will.
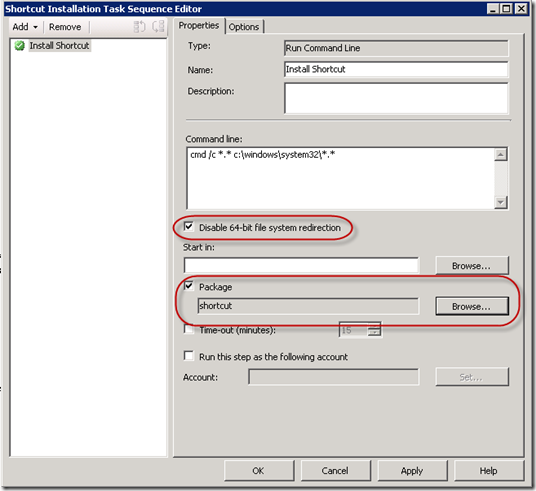
In one case we needed to put a file in SYSTEM32 folder. I know it is not a good idea to put files there, but it was a requirement of a third-party app. If you try to run a program to copy a file to C:\WINDOWS\SYSTEM32 you may have a surprise – on 64-bit OS your file will occur in c:\WINDOWS\SYSWOW64 instead of \SYSTEM32! To workaround this behaviour you can use a Task Sequence: 1. Add a Run Command Line step to a custom TS. 2. Configure the step Disable 64-bit file system redirection 3. Add you Package (that instructs the TS to copy it to a local cache) 4. Add command line. |
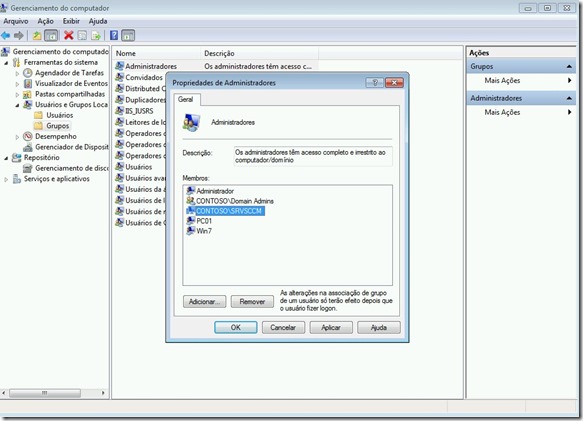
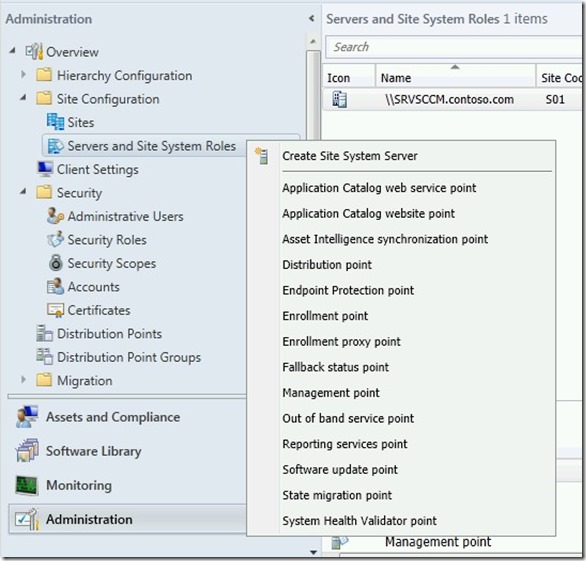
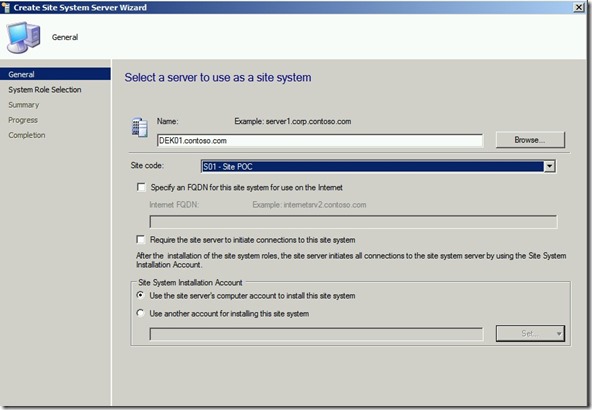
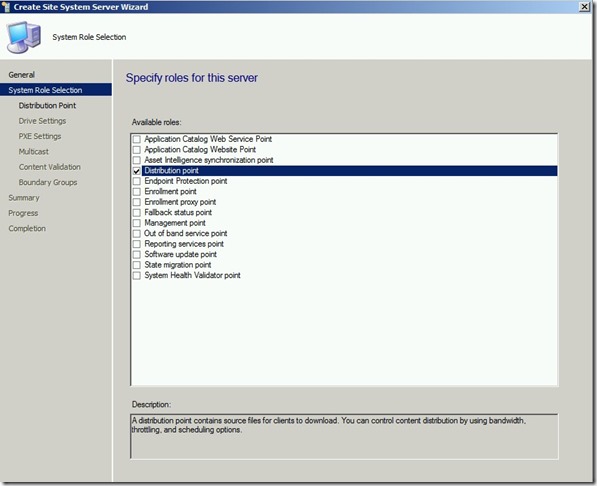
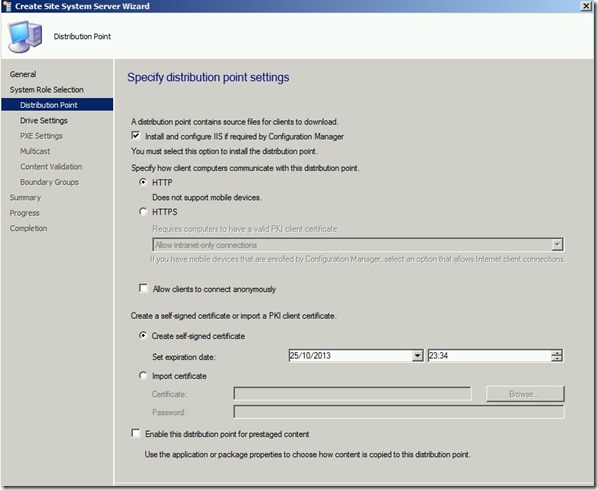
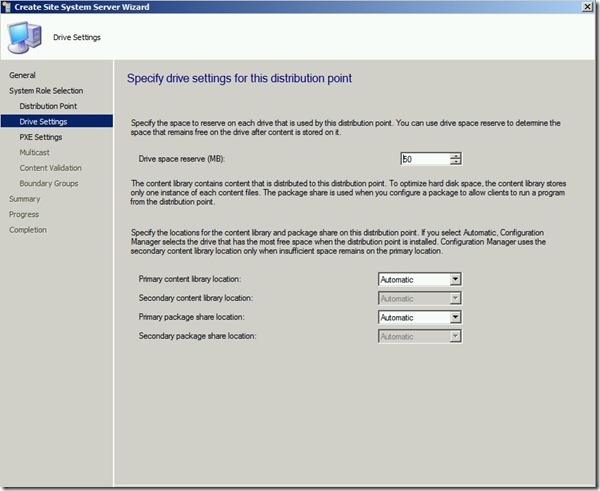
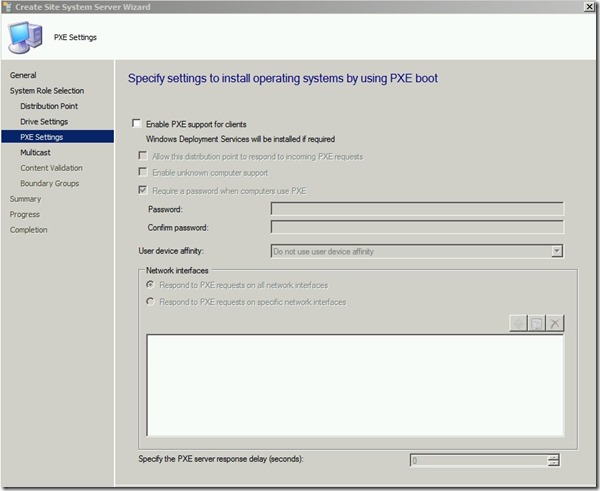
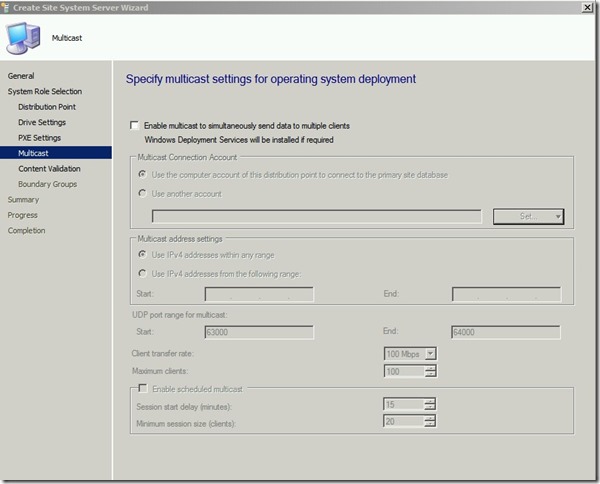
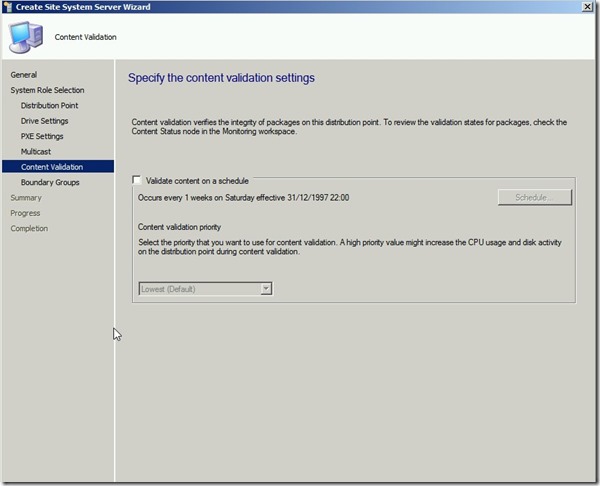
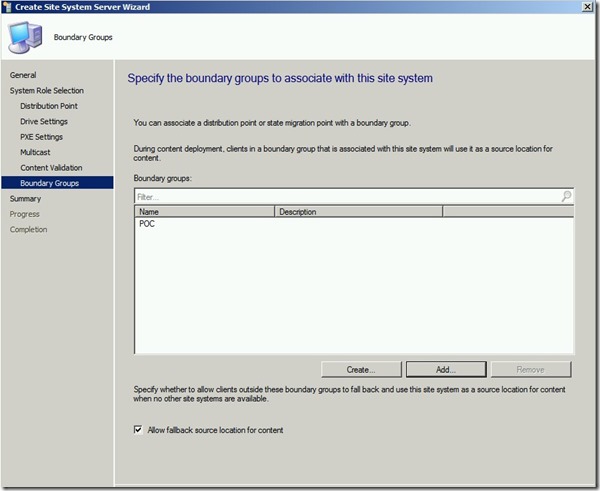
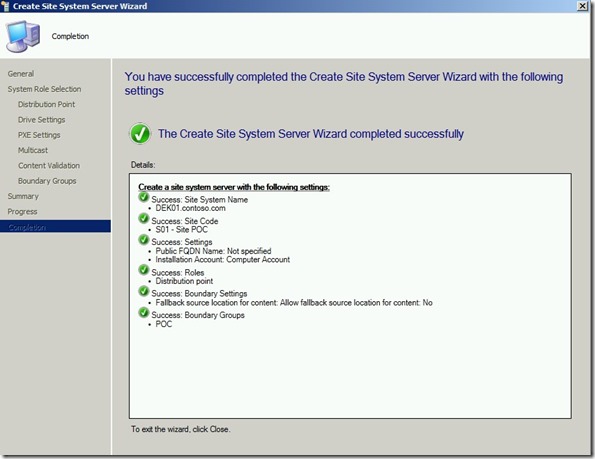
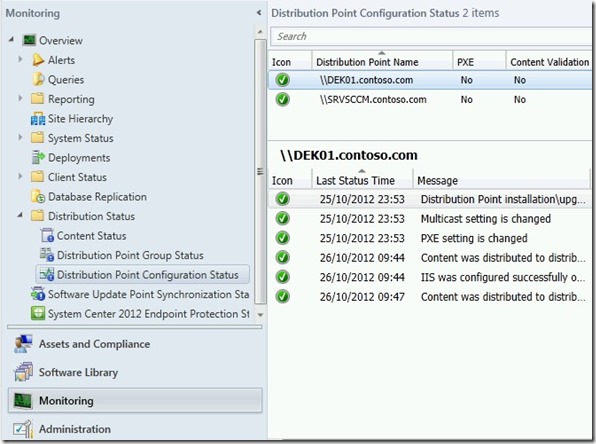
| Distribution Point no Windows 7– SCCM 2012. Posted: 26 Oct 2012 05:50 AM PDT Olá pessoal, Hoje eu vou explicar como configurar um DP em um Windows 7, que no caso é bem mais simples que no SCCM 2007. Primeiro precisamos verificar se nossa máquina atende aos pré-requisitos, aqui. Lembrando que para Windows XP SP3, Windows Vista, Windows 7 e Windows 8 não é suportado a função de PXE e Multicast. Vamos lá. Adicionar a conta de computador do servidor SCCM como administrador local da estação Windows 7. No servidor SCCM em "Administration", "Severs and Site System Roles", vamos clicar em "Create Site System Server". Vamos adicionar a estação em "Name" e o site code correspondente ao DP. Selecionar a opção "Distribution point". Vamos seleciontar a opção "Install and configure IIS if required by Configuration Manager", pois se o IIS não estiver instalado na estação o próprio SCCM irá instalar. Caso você precise alterar o a unidade onde será armazenado os pacotes, realize nesse passo. Não vamos alterar nada aqui. Não vamos alterar nada aqui. Caso você queira validadar o conteúdo em um certo horário, configure aqui. Configure a boundary group correspondente ao site. Processo realizada com sucesso. Agora é só esperar e aguardar a instalação do DP na estação. Para acompanhar o processo verifique em "Monitoring/Distribution Status" e selecione o DP. As pastas foram criadas com sucesso no Windows 7. Caso a instalação do DP não ocorra com sucesso verifique o log "distmgr.log" e o componente "SMS_DISTRIBUTION_MANAGER". Abraço!! |
| SCCM - extracting the number of SEP definitions stored on the server Posted: 26 Oct 2012 03:41 AM PDT There is a well known issue with Symantec Endpoint Protection clients – they are not able to d |
| Posted: 26 Oct 2012 12:01 AM PDT
Working with good-old Get-WmiObject got better (IMO) in v3 – it's unintentional (I'm guessing), but it's the fact. Today I would like to share simple "trick" I use daily on my v3 admin workstation to get some info out of SCCM using WMI.
First of all – I've defined $WMIStatic variable: $WMIStatic = @{ ComputerName = $Server NameSpace = "root\sms\site_$Site" ErrorAction = 'Stop' } $Site and $Server point to server that you want to talk to. With that defined, you can get a lot info straight from SCCM WMI interface. E.g. list some classes available for you: Get-WmiObject @WMIStatic -Class *Collection* -List And now for the best part: v3 in action. It helps a lot with thing I do very often, listing collection that given workstation belongs to: gwmi @WMIStatic SMS_R_System -Filter "Name = 'WAR000260'" | % GetRelated SMS_Collection | % Name It's obviously console-mode (aliases, positional parameters) but I usually just need a peek, so I do it interactively. And if I need to make sure that given workstation is a member of collection it suppose to be in I can do: gwmi @WMIStatic SMS_R_System -Filter "Name = 'WAR000260'" | % GetRelated SMS_Collection | ? Name -Match PartOfCollectionName | % Name $WMIStatic is defined in my profile – so I have it available all the time. Makes working with SCCM so much easier at times.. |
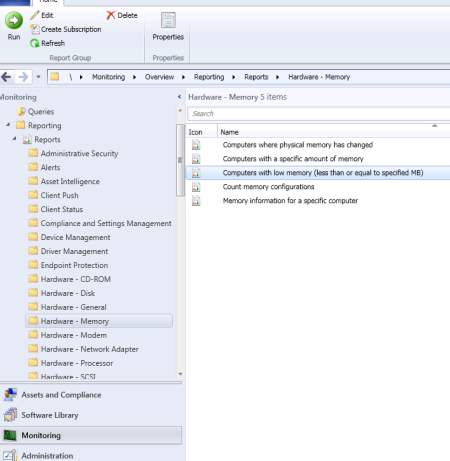
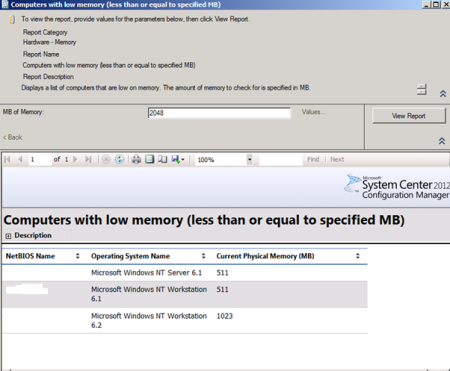
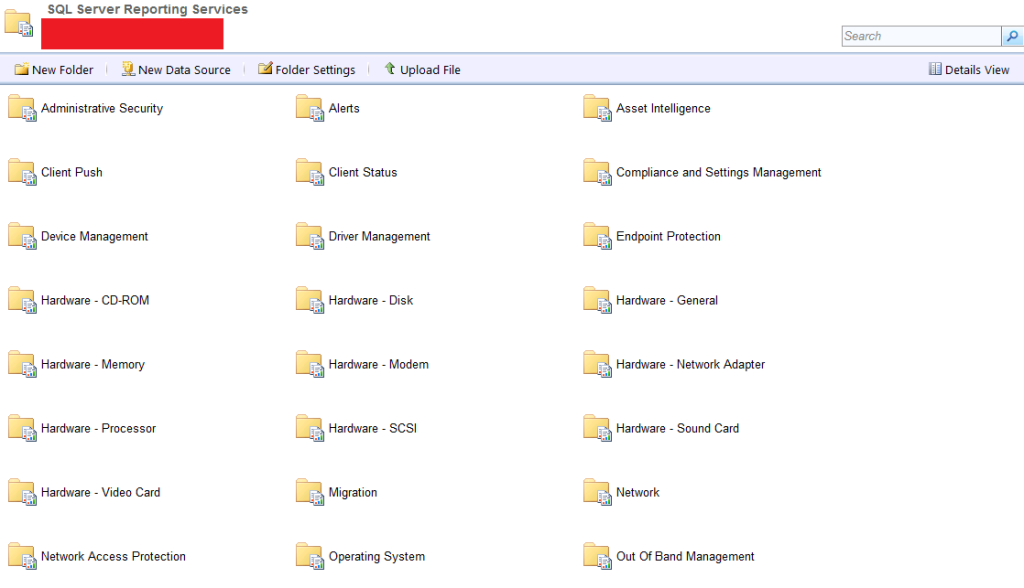
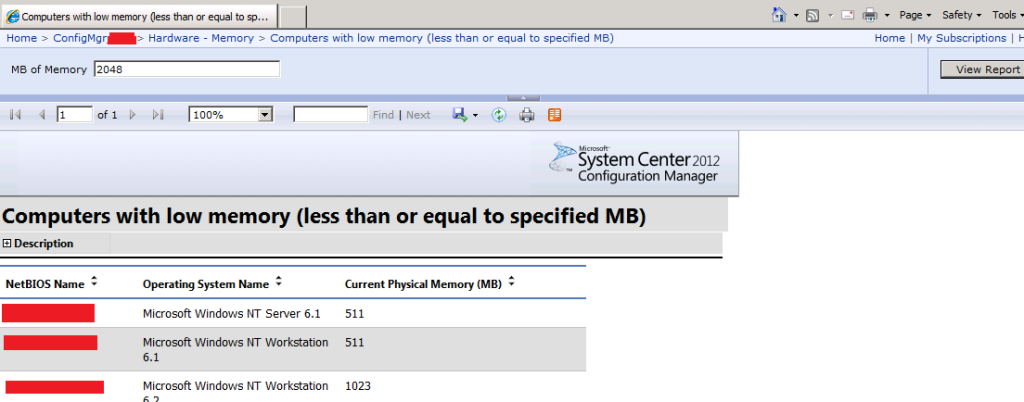
| SCCM 2012 Reporting for dummies: Viewing Console and Web Reports Posted: 25 Oct 2012 09:36 AM PDT Now we're getting to the real meat of this series. We'll be looking at the reports through the console, through a web browser and then in the next blog post, we'll be using SSRS to create our own custom reports. First we want to review a report to see how they work in the console. Go Reports > Hardware – Memory > Count with low memory (less than or equal to specified MB). You can see we easily retrieve the information back from the SCCM database that has been collected from your environment and shown in this nice little report. You can even drill down to get even more specific information by clicking on relevant links on reports where applicable. But here's the problem. What if your line manager or an executive somewhere wants this report? You don't want to give them access to the console. Firstly they can do untold amounts of damage or just get confused at all the amount of clickable buttons. We want something simpler… That's where the web reports come in handy. They allow people to view reports without the need to access the console. If you open a web browser and type in "http://<yoursiteservername>/Reports" you should be greeted by the ConfigMgr reports page. You'll need to modify the <yoursiteservername> to your site server name. For ease of access, you can set up a DNS alias to make the server name more memorable.
|
| RE : Software Assurance Pays Off Remote Connection to WinPE during MDT SCCM deployments Posted: 25 Oct 2012 09:02 AM PDT I was trying to use "unattend.xml" to enable remote control using DART 7 Remote Connecti |
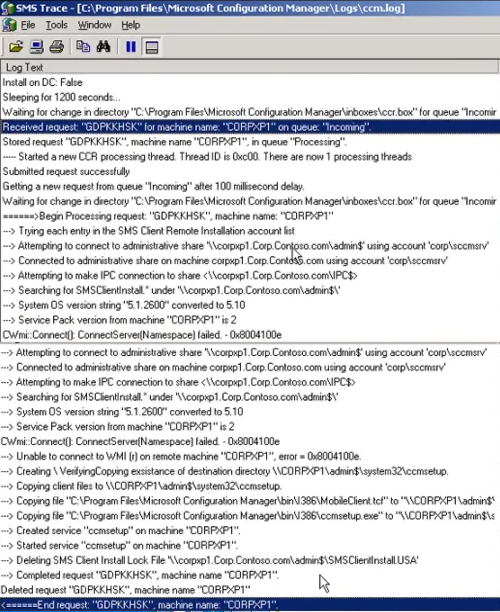
| Posted: 25 Oct 2012 08:54 AM PDT Overview Within Config manager the client is within the "All Systems" collection however, under the column 'Client' the answer is NO. Stage 1 First thing to do is click on "Client installation methods" located under Site Settings. Then right click on "Client Push Installation" and select properties. On the general tab if you click on "Enable Client Push Installation to assigned resources" any system discovered throug AD (or other) will have a client automatically installed. Depending on you environment consider this tick box. On the Accounts tab you must input account credentials that will have administrative access to the admin$ share of the client system. The account that can access desktops may be different to domain controllers so you can put multiple accounts in here and it will try them in order. On the Client tab you can specify the Site code. It is also possible to define SMS cache size rather than the 5gb default. See Microsoft for additional properties http://technet.microsoft.com/en-us/library/bb680980.aspx Client agents under Site Settings will list the agents that will be pushed out with the SCCM client. Stage 2 Now SCCM is configure correctly and agents have the appropriate account setup for connection. Right click the system without the client, Then "Install Client". This will bring up a wizard, i like to select include only clients in this site's boundaries and Always install (repair …). Finish the wizard. Stage 3 Check the log files for errors! c:\Prgram Files\Microsoft Configuration Manager\Logs Using Trace32 open the CCM log on the SCCM server. Which will show the client deployment process so we can see if it is succeeding. On the client system you can open the CCMSetup log file to monitor the client installation (this can take a while to complete (located admin$\system32\ccmsetup\ccmsetup.log) On the client there are three key log to know that your client install was successful (located dmin$\system32\ccm\logs) "Clientlocation.log" confirm the current management point is correct. Stage 4 Within the control panel there will now be three additional icons. The Configuration Manager, Run Advertised Programs, Remote control Properties, and Program Download monitor. There are two services installed on the client system. |
| SCCM 2012: Azure-based cloud Distribution Point Posted: 25 Oct 2012 06:55 AM PDT SCCM 2012 SP1 introduces a new feature – cloud-based Distribution Point (DP). The DP must be based in Microsoft Azure. Peter blogged here step-by-step for the DP creation. |
| SCCM 2012: OSD–Should Office (or any other App) be a part of base image? Posted: 25 Oct 2012 06:51 AM PDT Rapael blogged some measurement for three scenarios: 1. Post OSD installation via Application Installation 2. Post image installation in the same TS 3. OSD when Office is a part of the image.
The winner is – method #2. Of course it depends on your network, TS, number of apps etc and need to be tested in your environment. But still good information. |
| Posted: 20 Dec 2012 04:02 PM PST |
| Posted: 20 Dec 2012 04:01 PM PST I've seen a few posts around that give somewhat of a brief overview of what's new for System Center 2012 in SP1, but Microsoft has gone ahead and updated the What's New in System Center 2012 SP1 page in the […] Comments: 0 |
| Rod Trent wrote a new post, myITforum coming to the System Center Universe Posted: 20 Dec 2012 03:27 PM PST Just a quick note that we'll be attending the System Center Universe event live, sitting at the Social Media Corner, providing real-time news and commentary throughout the day. In case you missed it last year, […] Comments: 0 |
| You Are Invited to Join Us at System Center Universe 2013 Posted: 20 Dec 2012 02:50 PM PST
On behalf of Microsoft and the event host, Catapult Systems, you are invited to join us at System Center Universe 2013! The second annual System Center Universe is a one-day globally available technical event featuring Microsoft product gurus and community experts who will highlight the interaction of the System Center 2012 suite and other Microsoft-based products and solutions. It's System Center 2012 with new galaxies! The live, in-person event will be launching at the Irving Convention Center in Irving, Texas. We hope that you will join us in person! There is also an opportunity to view via a live simulcast. You can register for either the in-person event or simulcast here. · In-person Event: Irving Convention Center, Irving Texas, 1/31/13, register here. · Catapult Coordinated Simulcast Viewings: Austin, San Antonio, Houston, Denver, Phoenix, Charlotte, Atlanta, Tampa and other locations. For a list of all locations and to register, please go here. · User Group Facilitated Viewings: Interested in your user group participating in SCU2013? Please email SCU2013@catapultsystems.com to receive a SCU 2013 facilitator package. · Virtual Viewing: Available worldwide via www.systemcenteruniverse.com · SCU2013 Mobile Application: Available on Windows Phone, Android and iOS for all in person and virtual registrants · Engage with the Community: Follow #SCU2013 on Twitter, Facebook, LinkedIn, Pinterest and check out the fun teaser videos: Video 1, Video 2, and Video 3 will launch 1/1/13! |
| You are subscribed to email updates from SCCM by Davis To stop receiving these emails, you may unsubscribe now. | Email delivery powered by Google |
| Google Inc., 20 West Kinzie, Chicago IL USA 60610 | |







 This will open a new window. We now want to specify the criteria which in this case, we're looking for machines that have less than 2GB in physical memory (RAM). We'll put



No hay comentarios:
Publicar un comentario