

SCCM by Davis |

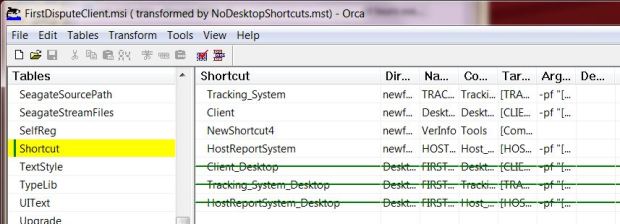
- Nick Moseley wrote a new post, Removing Desktop Shortcuts for First Dispute Client
- LTI/ZTI PowerShell: Deployment Script logging
- #SCCM / #ConfigMgr 2012 :: RBA : Infrastructure Administrator Client Setting Issue
- Linux and Unix Clients for SCCM 2012 SP1
- UPDATE : #Microsoft System Center 2012 Technical documentation for #ITPRO #sysctr #SCVMM
- LTI/ZTI PowerShell: Comment Based Help
- LTI/ZTI PowerShell: Using parameterised scripts in Task Sequences
- Install Guide for ConfigMgr 2012 SP1 Beta + Server 2012 + SQL 2012 CU 3
- Not #SCCM / #ConfigMgr : My Blog is listed in BizTech Magazine's 50 Must-Read IT Blogs of 2012 !!!
- Rod Trent posted an update in the group System Center Operations Manager: Microsoft Office Web Apps Server MP Guide for Opsmgr released
- Rod Trent wrote a new post, Microsoft Office Web Apps Server MP Guide for Opsmgr released
- Rod Trent posted an update in the group Windows 8: Beware the Windows 8 to Windows RT Profile Sync
- Rod Trent posted an update in the group Microsoft Surface: Beware the Windows 8 to Windows RT Profile Sync
- Rod Trent wrote a new post, Beware the Windows 8 to Windows RT Profile Sync
- Removing Built-in Applications from Windows 8
- Rod Trent wrote a new post, FAQ: Do I need to reinstall Microsoft Security Essentials on Windows 8 or Windows RT?
- Windows 8 Start Screen Customization with MDT
- SCCM by Davis
| Nick Moseley wrote a new post, Removing Desktop Shortcuts for First Dispute Client Posted: 27 Oct 2012 09:13 AM PDT
Comments: 0 | ||||||||||||||||||||||||||
| LTI/ZTI PowerShell: Deployment Script logging Posted: 19 Sep 2012 09:00 PM PDT
The task sequence step "Run PowerShell Script" has some cool features. One of which is the way it handles information returned from the Write-Host, Write-Warning and Write-Error cmdlets. MDT collects Information(Write-Host), Warnings(Write-Warning) and Errors(Write-Error) returned from a cmdlet in a script. The information is stored in the deployment logs(BDD.log and also a log with the scriptname). To test this, I've written a simple script, just 3 lines. Write-Host"This is an Information message." Running the script returns this at the end of the deployment:
As you can see, the warnings and errors returned from using the Write-Warning and Write-Error cmdlets are displayed at the end of the deployment(although, I'm not sure why it's tripled the error count). This yellow screen can generate unnecessary comeback sometimes. In some cases the warning is harmless. So in those situations I use the common parameter –WarningAction "SilentlyContinue" at the end of the script line to supress the messages. This prevents your deployments from looking like they've failed when they haven't really. Another thing you can try is to add this line to the start of your script. $WarningPreference = "SilentlyContinue Right, looking at my output, in the log files MDT has handled all the logs and coded them appropriately.
I'm pleased with this and am sure it will save me having to do a lot of work. Remember, if you call a module that has a function that uses Write-Warning then you will see the yellow screen at the end of your deployments. You may have to edit the function to supress the message as it exists within a different scope. | ||||||||||||||||||||||||||
| #SCCM / #ConfigMgr 2012 :: RBA : Infrastructure Administrator Client Setting Issue Posted: 19 Sep 2012 12:20 PM PDT In this post, I'll provide few tips to resolve some common issues with build-in security role "Infra | ||||||||||||||||||||||||||
| Linux and Unix Clients for SCCM 2012 SP1 Posted: 19 Sep 2012 10:19 AM PDT The following UNIX and Linux versions are supported in the Beta release.
The Clients can be downloaded from here This blog post describes how to install them. | ||||||||||||||||||||||||||
| UPDATE : #Microsoft System Center 2012 Technical documentation for #ITPRO #sysctr #SCVMM Posted: 19 Sep 2012 06:21 AM PDT
Download System Center 2012 Virtual Machine Manager Technical Documentation here
Download System Center 2012 App Controller Technical Documentation here
Download System Center 2012 Service Manager Technical Documentation here
Download System Center 2012 Operation Manager Technical Documentation here
Download System Center 2012 Orchestrator Technical Documentation here
Download System Center 2012 Data Protection Manager Technical Documentation here | ||||||||||||||||||||||||||
| LTI/ZTI PowerShell: Comment Based Help Posted: 18 Sep 2012 09:00 PM PDT
I recommend using PowerShell comment based help to document your deployment scripts as described on Technet in about_Comment_Based_Help. This makes your scripts self documenting so colleagues can see who wrote it, what it does and examples and parameter usage. Below, I've added an example of comment based help to my evolving rename-computer script. Anything between the <# and #> in PowerShell is a comment. I've also documented it internally by adding a # comment line to each section of code. <# .SYNOPSIS Lite-Touch Deployment script to rename a computer
.DESCRIPTION The ZTIRename-Computer.ps1 script will rename a computer and join a new workgroup.
.PARAMETER Name Specifies the new computername
.PARAMETER WorkgroupName Specifies the new Workgroup name
.EXAMPLE %SCRIPTROOT%\ZTIRename-Computer.ps1 Add this line to your add powershell task sequence to take values from the deployment properties OSDComputername and Workgroup. Remember to add the task sequence step Restart Computer immediately after this step.
.EXAMPLE ZTIRename-Computer.ps1 -Name PC01 -Workgroup Continuum This will rename the computer to PC01 and the workgroup to Continuum after a reboot.
.NOTES Author: Andrew Barnes Date: 14 September 2012
.LINK Online version: http://scriptimus.wordpress.com #>
Param ( [String]$Name=$TSEnv:OSDComputername, [String]$WorkGroupName=$TSEnv:JoinWorkgroup )
Begin{} Process{ # Rename the Computer using WMI (Get-WmiObject win32_computersystem).rename($Name)
# Add the computer to a new workgroup Add-Computer -WorkGroupName $WorkGroupName -WarningAction SilentlyContinue } End{} From a console, other users of the script can use the Get-Help cmdlet to access the documentation.
| ||||||||||||||||||||||||||
| LTI/ZTI PowerShell: Using parameterised scripts in Task Sequences Posted: 17 Sep 2012 09:00 PM PDT
There are methods in creating PowerShell scripts suitable for task sequence deployment. A good starting point is the Technet article about_Scripts. One of the most useful features of MDT/SCCM are the deployment properties. Today, I'm going to talk about using script parameters to pass deployment data into your scripts. As a subject, I'm going to create a script that renames a computer then joins a workgroup. This is because MDT doesn't do this natively(Post OS deployment). If you clone a VM then this is usually the first task you will do. Yes, PowerShell 3 has a cmdlet now for this but for earlier versions this is the method. Here is the first example of a simple parameterised script that will work in a task sequence. To accept parameters from the task sequence.The code is very simple and uses a standard PowerShell construct: Param ( [String]$Name, [String]$WorkGroupName ) Begin{} Process{ (Get-WmiObjectwin32_computersystem).rename($Name) Add-Computer -WorkGroupName $WorkGroupName -WarningAction SilentlyContinue } End{} Save the script in the deployment share under the scripts folder and call it ZTIRename-Computer.ps1 Next, add it to MDT by creating a new Run PowerShell Script, task sequence step.
Set the PowerShell script value as: %SCRIPTROOT%\ZTI-Rename-Computer.ps1 Then set the Parameters value as: -Name CON-LAB1 -WorkGroupName Continuum This is how you accept the parameters from the task sequence itself. Note: This particular script will need a restart but MDT can handle that itself so I added a Restart Computer step beneath it rather than code it in PowerShell. To use deployment parameters with a script.You will probably want to use your script on a number of different computers. In which case, you will need to call parameters from the customsettings.ini file or deployment database. First configure the computer name and workgroup parameters as normal in the customsettings.ini or database. eg: OSDComputername = CON-Lab1 Next, modify the Task Sequence step and change the Parameters section to these values: -Name $TSEnv:OSDComputername -WorkGroupName $TSEnv:JoinWorkGroup
This will use the deployment parameters and overwrite any defaults that may have been coded in the script. Speaking of which. . . To code parameter defaults in the script.In the script modify the Param section to store the values to the deployment properties. You can hard code the values or use the deployment parameters like in this example: Param ( [String]$Name = $tsenv:ComputerName, [String]$WorkGroupName = $tsenv:JoinWorkgroup ) Begin{} Process{ (Get-WmiObjectwin32_computersystem).rename($Name) Add-Computer-WorkGroupName$WorkGroupName-WarningActionSilentlyContinue } End{} For a script like this I would prefer to keep the parameters in the script to save having to enter the parameters in the task sequence. | ||||||||||||||||||||||||||
| Install Guide for ConfigMgr 2012 SP1 Beta + Server 2012 + SQL 2012 CU 3 Posted: 17 Sep 2012 11:31 AM PDT Rob Marshall published very detailed step by step guide how we can install SCCM 2012 SP1 beta with SQL 2012 and Server 2012. If you want to create your test lab for SCCM 2012 SP1 beta you can follow the steps provided here. | ||||||||||||||||||||||||||
| Not #SCCM / #ConfigMgr : My Blog is listed in BizTech Magazine's 50 Must-Read IT Blogs of 2012 !!! Posted: 17 Sep 2012 09:13 AM PDT Below picture shows you all. My blog is listed in the BizTech Magazine's "50 Must-Read IT Blogs 2012 | ||||||||||||||||||||||||||
| Posted: 26 Oct 2012 04:59 PM PDT | ||||||||||||||||||||||||||
| Rod Trent wrote a new post, Microsoft Office Web Apps Server MP Guide for Opsmgr released Posted: 26 Oct 2012 04:57 PM PDT This guide contains a Quick Start section to help you set up the environment, import management packs, and configure the system for monitoring by using SCOM. It also contains monitors and rules for Office Web Apps […] Comments: 0 | ||||||||||||||||||||||||||
| Rod Trent posted an update in the group Windows 8: Beware the Windows 8 to Windows RT Profile Sync Posted: 26 Oct 2012 04:46 PM PDT | ||||||||||||||||||||||||||
| Posted: 26 Oct 2012 04:46 PM PDT | ||||||||||||||||||||||||||
| Rod Trent wrote a new post, Beware the Windows 8 to Windows RT Profile Sync Posted: 26 Oct 2012 04:44 PM PDT
Comments: 0 | ||||||||||||||||||||||||||
| Removing Built-in Applications from Windows 8 Posted: 25 Oct 2012 07:54 PM PDT When creating a Windows 8 Image for the Enterprise you may not want to include all of the default Windows Store Applications. These applications are easy enough to remove by right clicking on the app tile in the Start Screen, but as you most likely know I am lazy and like to automate everything, so I prefer to use PowerShell. To remove an application with PowerShell you need to remove it in two places:
To remove the provisioned package you use the command Remove-AppxProvisionedPackage and to remove the installed package you use the command Remove-AppxPackage. If you want to remove all of the built-in applications then you can use the following simple PowerShell commands:
However I often want to leave some of the applications in the image, I need granular control. In this case you need to find the PackageFullName value for each application and then remove each app individually. Getting this information can be a tedious process so I have created a script that you can use to remove the applications. This script works for both X84 and X64 versions of the Windows 8. I usually comment out the lines for the apps that I want to keep and then add the script to the MDT task sequence that I use to create my master image. The script is included below:
For more information on adding and removing apps please refer to this TechNet article. This post was contributed by Ben Hunter, a Solution Architect with Microsoft Consulting Services. Disclaimer: The information on this site is provided "AS IS" with no warranties, confers no rights, and is not supported by the authors or Microsoft Corporation. Use of included script samples are subject to the terms specified in the Terms of Use. | ||||||||||||||||||||||||||
| Posted: 26 Oct 2012 02:11 PM PDT This question is showing up already. So, here's the answer...
Comments: 0 | ||||||||||||||||||||||||||
| Windows 8 Start Screen Customization with MDT Posted: 25 Oct 2012 07:51 PM PDT If you are creating a Windows 8 image then you most likely want to customize the Start Screen layout that users see when they logon for the first time. However the question is "how should I customize the Start Screen?" There are three approaches that you can use:
The main approach that I use is CopyProfile. I use this approach because this gives me control over the process. The one drawback is that it requires manual steps in the image creating process, and I love to automate everything! However at present the really isn't a viable alternative to manual steps. In the rest of this post I will detail how to customize the Start Screen using options 2 and 3 when building an image using MDT 2012 Update 1. Customizing the Start Screen As mentioned above when I create a Windows 8 image I always like to fully automate the process. This provides a consistent and repeatable image engineering process, however the customization of the Start Screen must be performed manually. To minimize the manual steps I pause the task sequence using the little know built-in MDT script - LTISuspend.wsf. I then perform the customization and resume the task sequence. The following steps outline this process: 1. Add the LTISuspend.wsf script to the task sequence. This action should be added as highlighted in the picture below. 2. During the deployment you will see the following prompt. 3. Bring up the Start Screen and manually arrange the tiles and label groups as needed.
Once the image has been captured there are two options for replicating these changes to the default user profile. Customization using CopyProfile The CopyProfile process has been well documented in a this Deployment Guys post. In summary you must add the CopyProfile option to the unattend.xml used to deploy the image (NOT the unattend.xml used to create the image). This will then copy the Start Screen layout from the local administrator profile (that you manually customized) to the default user profile. Then when a user logs in for the first time they receive this layout. The CopyProfile option should be added to the specialize pass section as follows:
Customization using App Layout file During the Sysprep generalization process a file is created called AppsFolderLayout.bin. This file contains the layout for the local administrator in a generalized form which can be applied to other users. To use this file we simply copy the file from:
The script located here will perform this process. Simply add this script to the task sequence immediately after the Postinstall \ Configure step as shown below.
Here are few extra tips that will help with your Start Screen customization:
For more information on customizing the Start Screen please refer to this TechNet article. This post was contributed by Ben Hunter, a Solution Architect with Microsoft Consulting Services. Disclaimer: The information on this site is provided "AS IS" with no warranties, confers no rights, and is not supported by the authors or Microsoft Corporation. Use of included script samples are subject to the terms specified in the Terms of Use. | ||||||||||||||||||||||||||
| Posted: 26 Oct 2012 01:38 PM PDT
System Center Configuration Manager - Davis Blog | ||||||||||||||||||||||||||


| You are subscribed to email updates from SCCM by Davis To stop receiving these emails, you may unsubscribe now. | Email delivery powered by Google |
| Google Inc., 20 West Kinzie, Chicago IL USA 60610 | |
No hay comentarios:
Publicar un comentario